It has been about 10 years since the Samsung Galaxy Note 3 has come out. At the time, this was one of the best android smartphones out there. Some of you might still use this device and wonder how to upgrade Samsung Note 3 from the legendary Samsung Note series. Well, let’s find out.
For your information, it is possible to upgrade to the Android version of your Note 3. And we will be sharing all the different ways you can accomplish that in this post. So if you are ready then let’s jump right in.

How to Upgrade Samsung Note 3 Android Version
Initially, the Samsung Note 3 came out with Android Jellybean. Later, a number of newer android versions were released gradually. And the users could upgrade the software directly via the phone’s settings.
However as the phone is discontinued and Samsung also not rolling out new updates, you cannot upgrade your Samsung Galaxy Note 3 officially.
In that case, you will need to install 3rd party ROM. in this section, we will share all the detailed instructions on how to upgrade your Note 3’s android version.
Method #1 Update Your Samsung Galaxy Note 3 via the Settings Menu
If you are still using the Note 3 with the default Android Jellybean, then you can follow this process. Because here we will be sharing how to upgrade the Android version of your galaxy note 3 from the settings menu Over the Air (OTA).

Steps to Follow
- First of all, you need to navigate to the Settings menu on your Note 3
- Next, you should tap on the General tab from the top right corner of the screen
- Now, you need to scroll down and tap on the About Device option
- After that, you will have to tap on the Software update option
- Remember, you must have working data connectivity or Wi-Fi connectivity in this case. Because your phone will download the updated file using the internet connection. So next, you have to tap on the Update option
- In doing so, it will start to search for a new update. So wait for the search operation to finish
- If there is a new update available then you will see a notification about that. And you will be able to download it as well
- So simply tap on the Download or Install or Update button and your phone will start to download the file
- Then you will need to tap on the Update button once the download has finished. In doing so, your phone will start to update to a newer android version
- You need to wait a few minutes to complete the entire process
- Your phone will restart automatically after the update is installed
Method #2 Update with Android 12 ROM on Samsung Note 3 (Advanced Method)
As the title suggests, we will be sharing the method of installing Android 12 ROM on your Galaxy Note 3 device in this section. However, before we begin, we have a few warnings for you.
First of all, you must take a backup of your files from your phone. Also, you should charge your phone to at least 60% or more. And most importantly, you should follow all the steps we are going to mention here very carefully and properly.
Remark: Installing a 3rd party ROM on your Galaxy Note is a bit tricky. If you follow our method and mess up or you brick or damage your phone in the process, we will not be responsible for that. So please do it at your own risk.
Requirements
- A Windows PC with a working internet connection
- USB cable
- Your phone with at least 60% charge
- Take a backup of your files from the phone
- Enable Developer Mode and USB Debugging
- Download and install Samsung USB drivers on your PC
- Unlock Bootloader on your Note 3
- Install TWRP Recovery on your Note 3
- Download the Android 12 ROM of your choice (we recommend the Lineage OS 19.1)
- Store the Android 12 ROM on your phone’s internal storage space
Now we will be sharing all the steps you need to follow to install the Lineage OS 19.1 or an android 12 ROM on your Galaxy Note 3. Here we go.
Step #1 Enable Developer Option and USB Debugging
First of all, you have to enable USB debugging mode on your phone if you haven’t already. Here we will be sharing a few steps following which you can enable this mode. Then we will proceed to the next step.
Steps to Follow
- You have to go to the Settings menu on your phone
- Then scroll down and tap on the About Phone option
- From the next page, you will have to tap on the Build Number option 7 times continuously. Don’t tap slowly here. You need to do it repeatedly
- After doing this, you will see a popup on your phone saying ‘You are a developer now’. That means you have enabled the developer option on your phone
- Now, go back to the Settings menu again
- And scroll down until you find a new option named Developer options and tap on it
- From the next page, you have to scroll down and turn on the USB Debugging option
Now you have enabled the USB debugging option on your phone. So let’s get to the next step.
Step #2 Unlock Bootloader on Your Note 3
In this step, we will show you how to unlock the bootloader on your Samsung Note 3. There are multiple ways you can do that. However, we will be sharing the easiest way out there. In this method, you will not even have to use your PC. You can do it directly from your phone. So let’s go.
Steps to Follow
- We assume that you have already enabled the Developer option on your phone
- Now, go to the Settings menu first
- From there you need to tap on the Developer options option
- After that, you will have to turn on the OEM Unlock option
That is it. You have unlocked your phone’s bootloader. Next, we will be installing a Recovery on your Note 3.
Step #3 Install TWRP Recovery on Samsung Note 3
For the record, this step is the most complicated one. So you need to focus really well to perform this without causing any trouble. Once again, do it at your own risk. We are not responsible if you mess up somehow.
Steps to Follow
- First of all, you will need to download Odin Flash Tool on your Windows PC
- Next, you will need to download the TWRP recovery file. There are many versions of the TWRP recovery tool. You have to download the one that is compatible with your particular phone model. You can download them from here – For International Exynos Model, For hlte model, For SM-N9006 Model (China), For SCL22, SC-01F model (Japan), For SM-N900K and SM-N900S model (Korea)
- After downloading these files, you need to keep them in your PC’s folder. Also, you should remember that folder. Because we will need that next. Plus, the TWRP recovery file should be in .tar format
- Now, you need to run the Odin tool with Run as an administrator
- After that, you should reboot your Samsung Note 3 into Download mode. To do that simply turn off your device first. Then press and hold down the Power button, Home button, and Volume Down button at the same time. Keep holding them until the phone restarts itself and then let go of the buttons
- Now, connect your Note 3 to your PC via a USB cable
- Once you have connected the phone, you will notice a blue box under ID:COM section. That means the connection was successful
- Now, you need to add the TWRP recovery file you have just downloaded to ODIN
- Then you have to click on the AP/PDA option to load the file
- Now, you should click on the Options tab on the popup window. From there you need to make sure that the ‘Re-partition’ option is unchecked
- Then simply click on the Start button and the process will begin shortly
- You will see a PASS message which indicates the process is completed
- Now your phone should restart itself. You can remove it from your PC
- However, if the phone is not rebooting, you can manually turn on the phone
Step #4 Download the Android 12 ROM on Your Phone
This is a simple step. You need to download the ROM file and keep it on your phone’s internal storage. We have already shared a download link for our choice of ROM. You can download that as we all as you can download any one of your choices.
Step #5 Flash the Android 12 ROM
This is the last step in upgrading your Note 3 to Android 12 using a 3rd party ROM. Here, we will be showing how to install the ROM on your Note 3. You can perform this in 2 different methods. However, for your convenience, we will be sharing the easiest method. So here we go.

Steps to Follow
- Make sure the downloaded ROM file is in the internal storage space of your phone
- Next, you need to turn off the phone
- After that, you need to enter into recovery mode. In order to do that, press and hold on to the Power, Home, and Volume down buttons at the same time until the phone boots. Then you can let go of the buttons
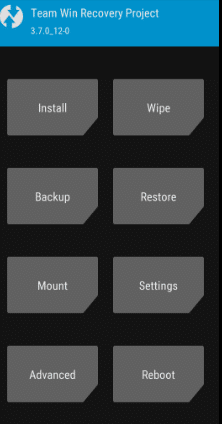
- Now, you will be in Recovery mode. So from there, you need to tap on the Install button
- Next, you need to browse and select the downloaded ROM file and select it to flash it
- To flash it, you need to swipe right on the screen
- Now, you need to wait until the process is completed
- After that, you need to restart the phone by selecting the Reboot button from the TWRP recovery home
Once the process is done, you will see that your phone has rebooted. You might have to set up the phone once again. However, this time you will see that the UI and everything have changed. And you are using Android 12 on your Samsung Galaxy Note 3.
FAQ
Are Official Updates Available for Samsung Galaxy Note 3?
Yes. Official updates are available on every android phone out there. However, the manufacturers don’t release the official updated versions of android forever. They offer support for a set period of time.
For instance, you cannot get any official updates on your Samsung Galaxy Note 3 right now. Samsung has already stopped releasing any new updates for the Note 3 a long time ago.
Is Updating My Note 3 with Unofficial ROM Harmful?
It is a very tricky question to answer. You know the 3rd party ROMs are not official. So it is not possible to say if they have any malware. Also, most of these ROMs come with a lot of bugs. So it is very much possible that you will have to face a lot of problems using 3rd party ROMs.
On the other hand, there are some ROMs that are not that buggy. And many people are using them without many issues. So in that case you should search and look for the best and most popular ROM for your phone. And also make sure, you are getting it from a safe website.
Can I Update my Note 3 to the latest version of Android?
Unfortunately, you cannot update your Galaxy Note 3 to the latest version of Android officially. At the time of writing this post, the latest version of android is Android 12. And Samsung hasn’t released any official version of the Android 12 for Note 3. So you cannot update it officially to the latest android version.
On the contrary, you can actually install 3rd party ROMs that will almost look and feel like the Android 12 version. We have already talked about how to do that in this post. You can follow those steps to install the latest version of Android on your Note 3.
Wrap Up
It is a very good idea to always keep your phone up to date. If you want to use the latest and best features and also keep everything secure, then you must update your android version to the latest one. In this post, we have talked about how you can update your Galaxy Note 3 to the latest android version.
We have shared multiple ways you can do so. We hope this post will come in handy if you are in the same situation of trying to update your phone’s software. If you have found this post helpful, don’t forget to share this with others. And if you happen to have any more queries, then let us know in the comments.


