Cellphones are like mini-computers that you can take anywhere. Nowadays, it is weird that somebody doesn’t have a smartphone, since you need it to do everything, starting with entertainment, all the way through work or study. That causes them to become an essential well that holds our whole life inside so that that information can get messy sometimes. In the following article, we will show you a few tips for organizing your cell phones, such as how to move pictures from one folder to another on Android and a few storage tips like how to send them to an SD Card.
How to move pictures from one folder to another on Android
Like computers, all phones have folders that allow their users to sort out their media, from photos and videos to documents. This is very easy to do. You have to do the following methods depending on how you would like to move them:
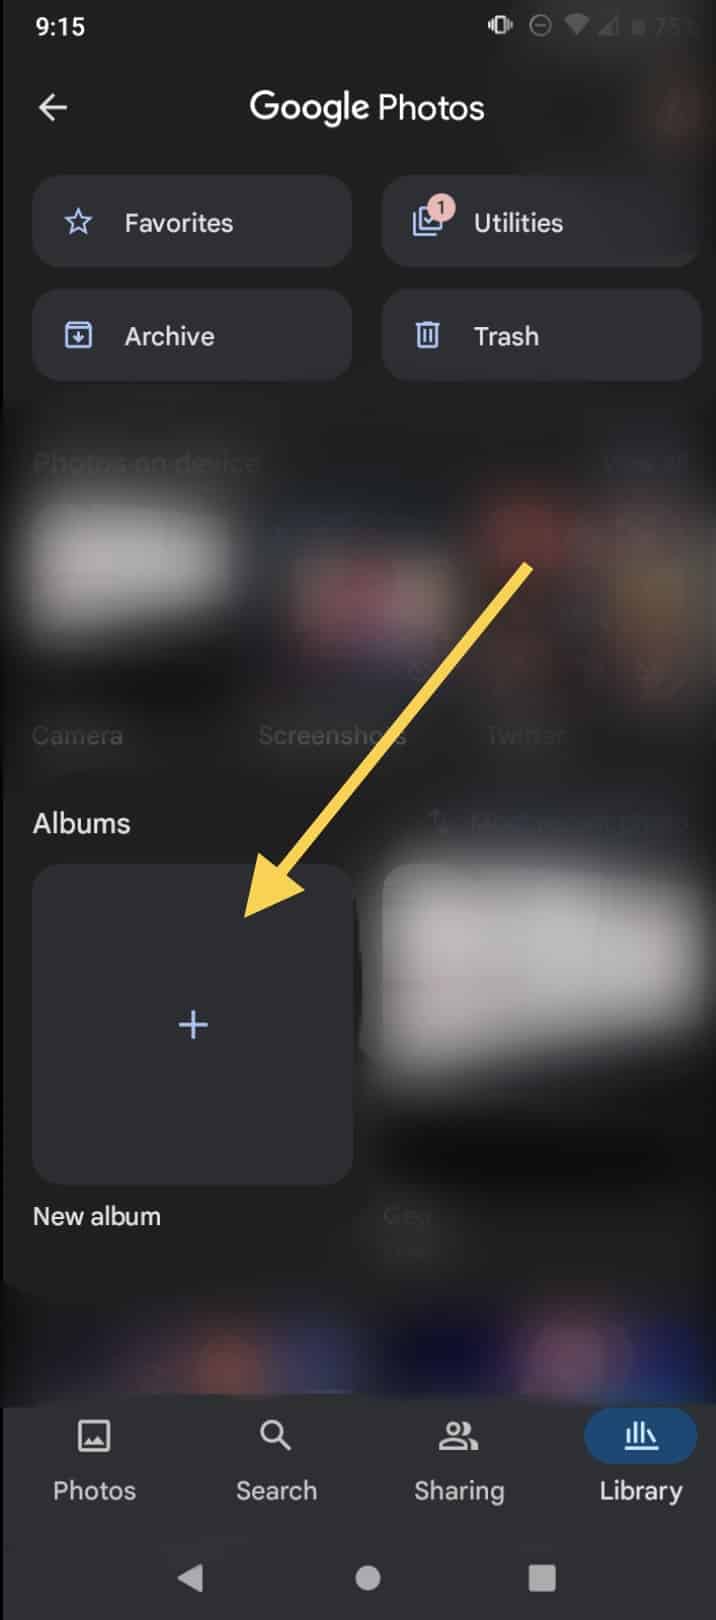
Creating a new album
- First, you have to open the Photos app.
- Go to the Albums section.
- Create a new album.
- When you decide on the album’s name, click on the Select Photos button that is down below.
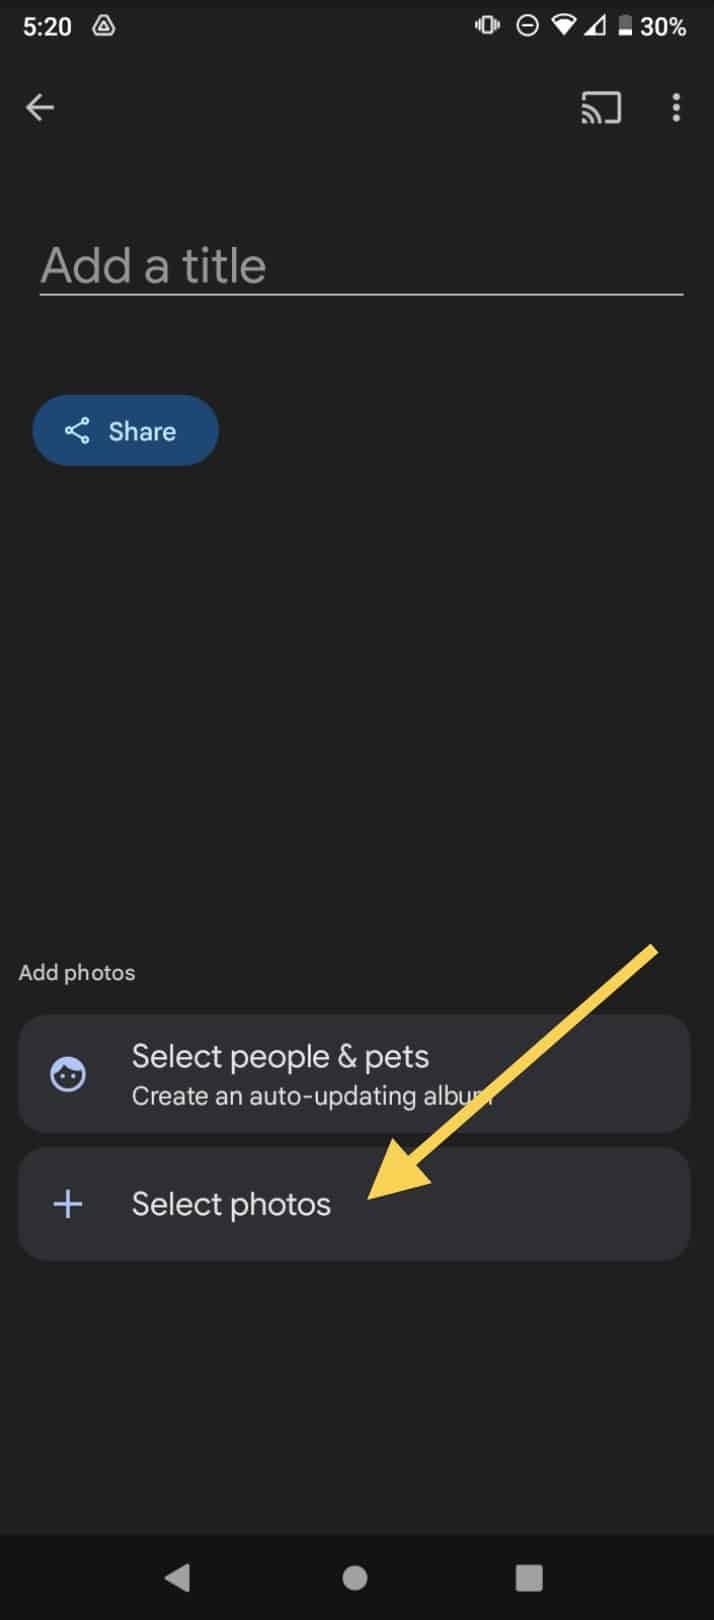
- Scroll through your gallery and select the pictures you would like to put on the album.
- When they are all selected, tap on Add.
- If you would like to move more pictures to the album in the future, go to the album and click on Add photos or go to the image, tap on the three-dot icon on the top right corner, and select Move to folder.
- Make sure you are logged into your Google account. This will allow you to look at your pictures from any device and create a backup so you won’t lose them. If your phone doesn’t make a backup, you can try going to the Photos app settings and managing your backup and sync preferences.
Move photos to Archive
- When you move your pictures to the Archive, they will stop showing in your Photos view; even though they will still be available on your phone, do it this way.
- Once again, open the Photos app.
- Look for the photo you want to archive and select it.
Now click on More. - Select the option that says Move to Archive.
Tip: to take it out of the archive, you have to enter the Archive, select the picture, tap on More and choose the Unarchive option instead.
Move pictures on the File app to a safe folder
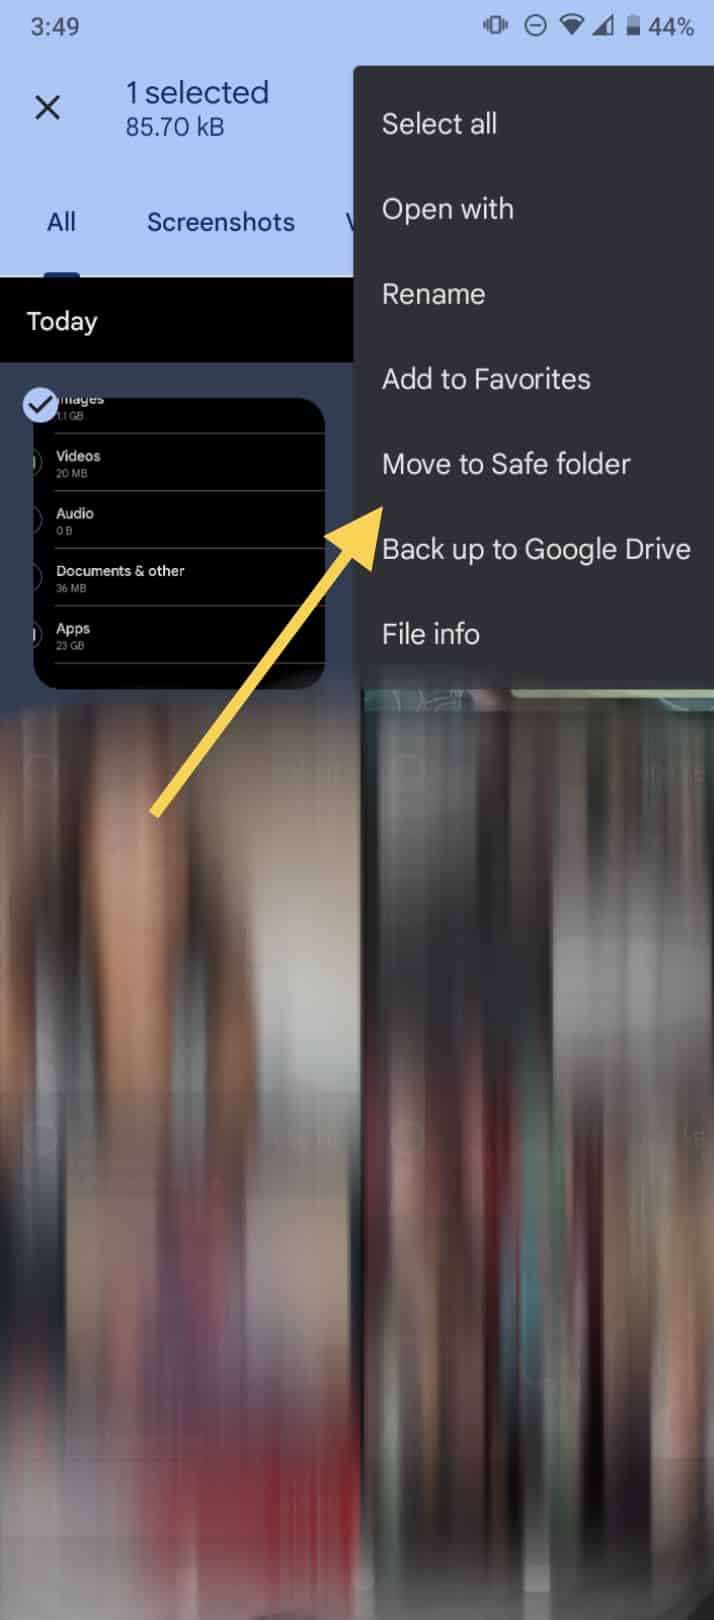
- Open the File app.
- Go to the Images section.
- Next, choose all of the pictures you want to move.
- Tap the three-dot icon located on the top right corner.
- Select the Move to Safe folder option.
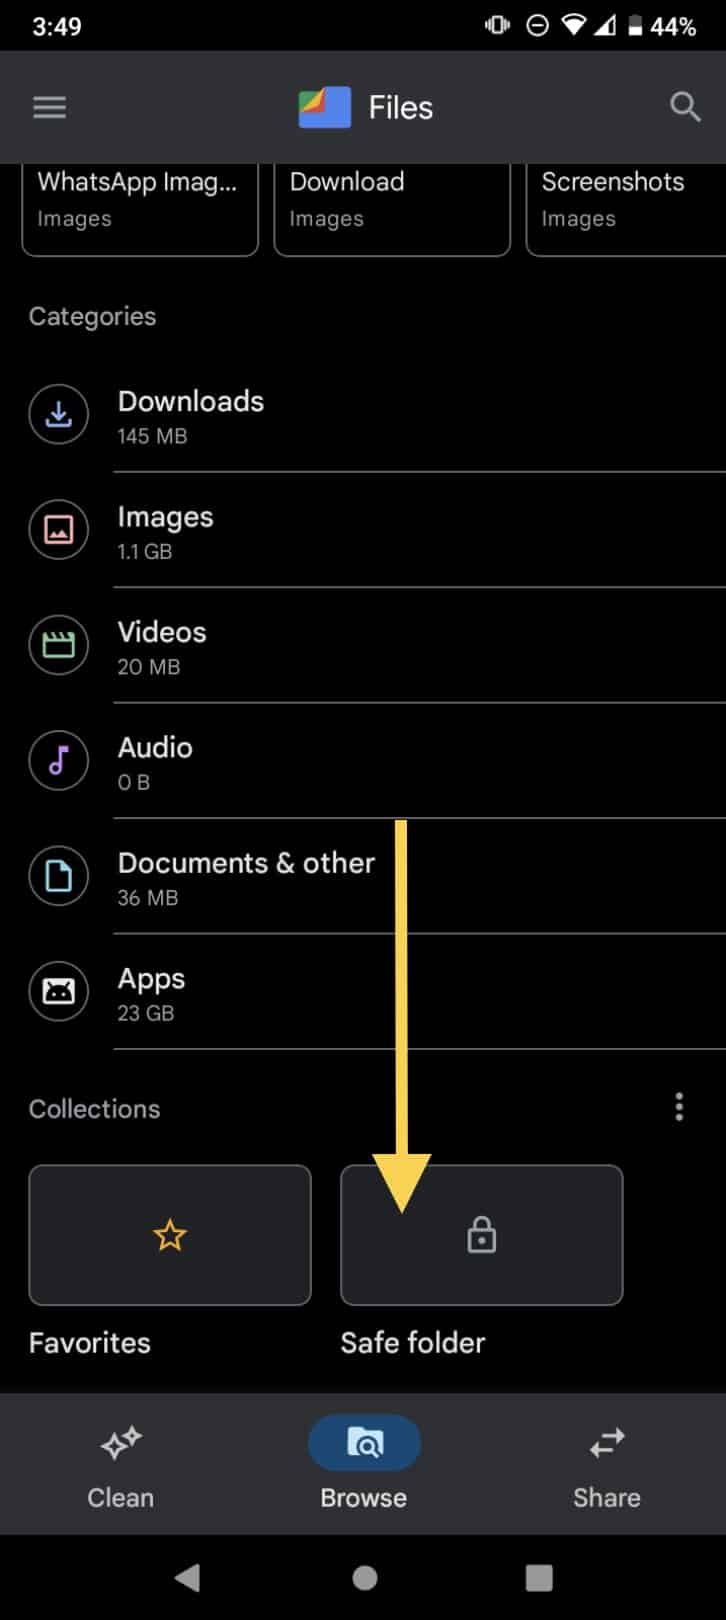
- Choose if you would like to use a pin or a pattern to secure the folder.
- Whenever you want to check on the folder, go to the Browse section on the Files app and put the password to access.
Move pictures using your computer
This method will be helpful if your phone doesn’t have a file manager app of some sort.
- Connect your phone to your computer using a USB cable.
- Now open the settings on your computer and look for Devices and Drives.
- Choose the name of your phone.
- Click on Internal storage.
- Next, select the folder with the pictures you want to move and copy them.
- Later go back to the folders, click on the new one and paste them.
How to move pictures to an SD card on Android
We are all familiar with Secure Digital cards, a great external storage device that allows different gadgets to expand their hold. Many phones have the option of using an SD card whenever they are running out of storage. If you are having trouble transferring media to your SD card, you should try these steps:
Moving files and pictures to SD card
- Insert the card on your phone.
- Open My Files or any manager you use.
- Go to the Internal Storage section.
- Look for the file(s) you want to move
- Select them.
- Click on the three-dot icon on the top right corner.
- Tap on the option that says Move.
- Choose SD card.
- You can either select a pre-existing folder or create a new one.
Moving apps to SD card
- Open the Settings app.
- Go to the Apps & notifications section.
- Select the app you want to transfer to the card.
- Click on Storage.
- Now, tap Change.
- Lastly, select an SD card.
Tip: whenever you buy a new phone, make sure that the one you consider has an SD card input, especially if you have used all your phone storage. This way, you are ensuring a longer life for the device.
How to move pictures from Android to PC
This last method is a great resource to save storage on your phone. If you have a lot of pictures or videos that aren’t necessary, you should transfer them to your computer. They will be safe and available whenever you want to watch them again. You can do it this way:
Transferring pictures using a USB cable
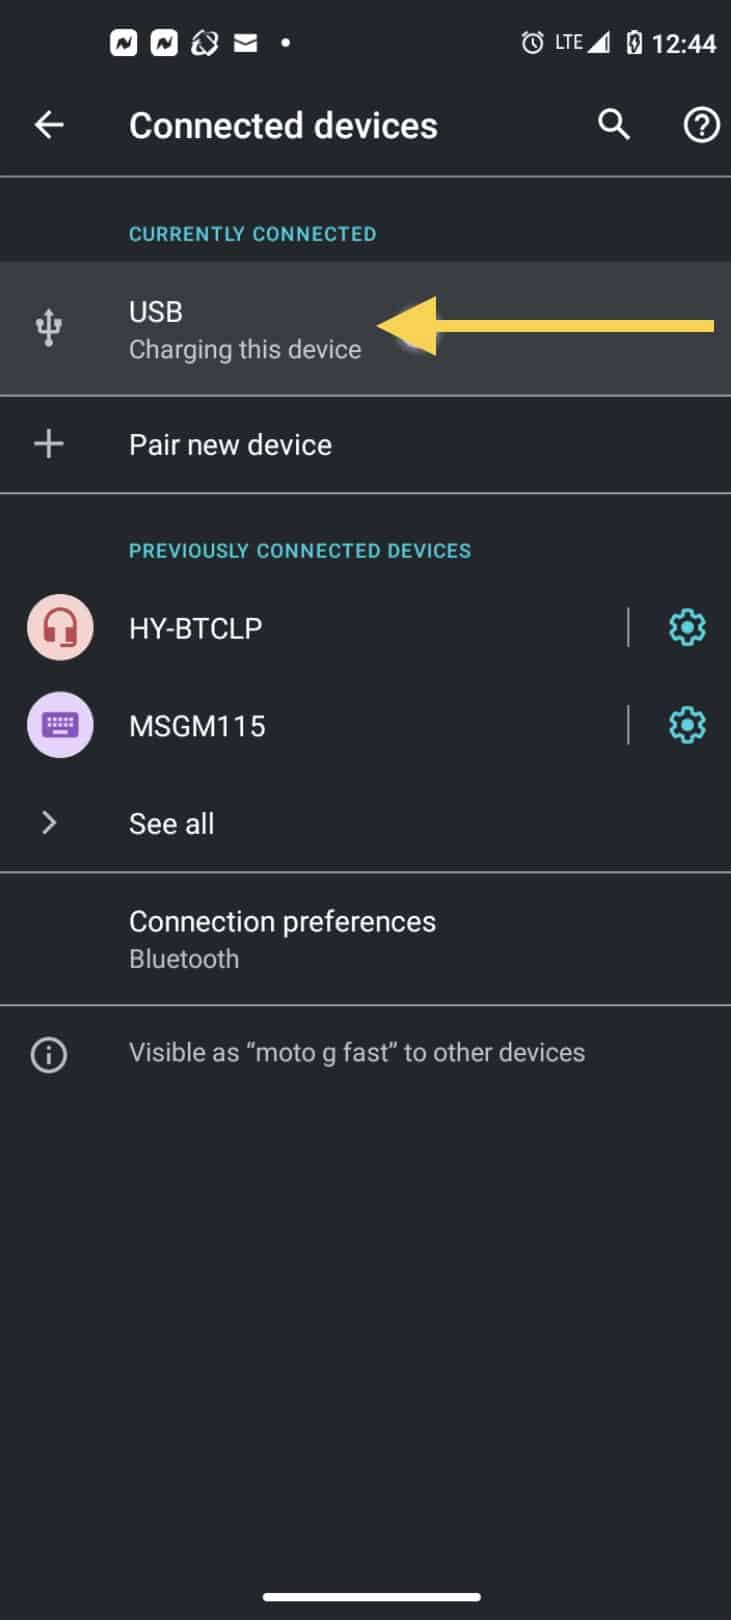
- Connect both devices using the cable.
- Go to your phone settings.
- Look for the Connected devices option.
Click on USB
- Next, select the File transfer option to allow your computer access.
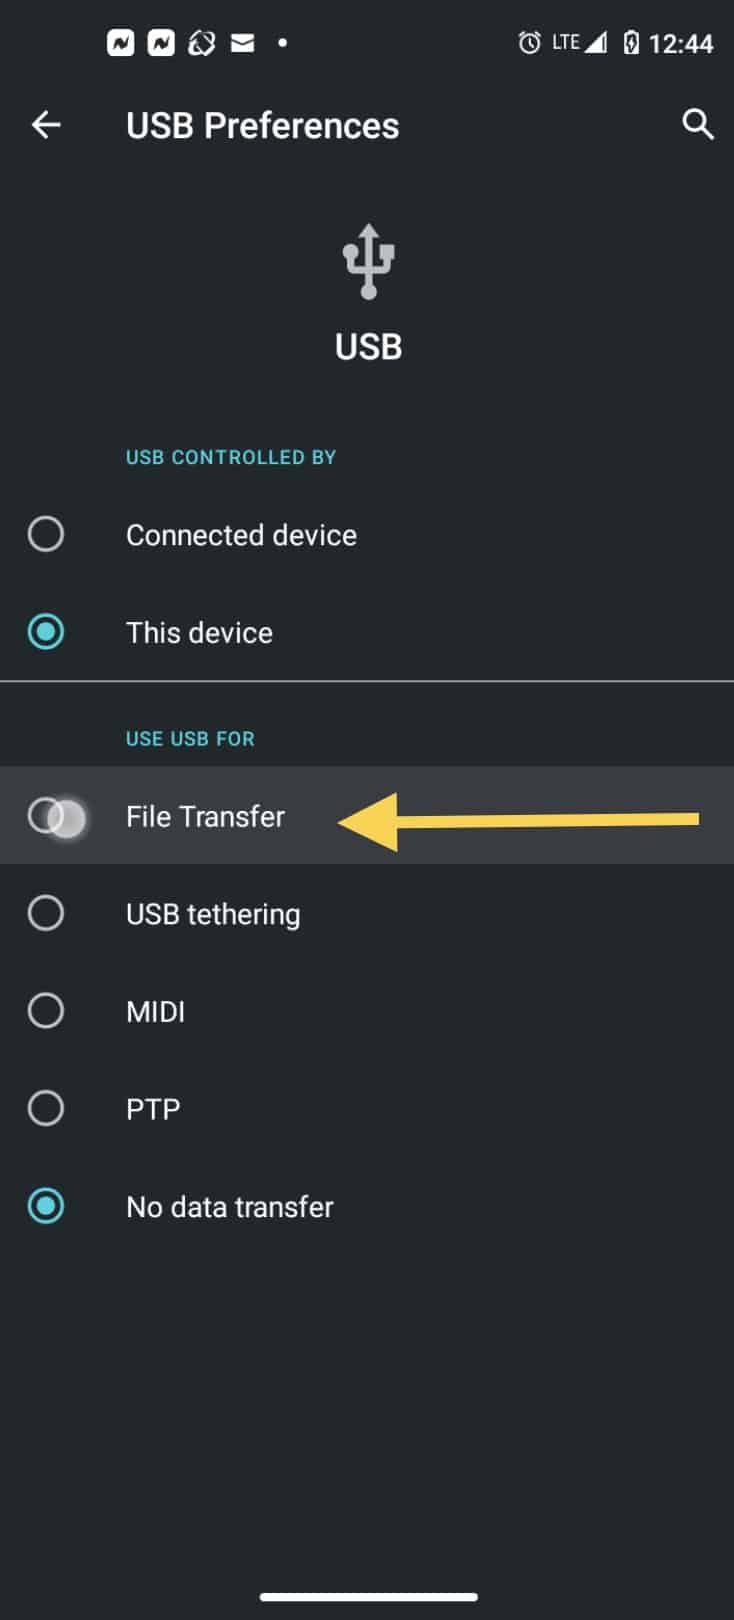
- Now, your phone will appear as a device on your computer.
- Open the File Explorer on the PC.
- Click on the phone to look at the files and look for the folder(s) you want to copy.
- Drag them to your computer and wait until the transfer is completed.
Tip: if your phone suddenly starts working wrongly, it may be because your storage is running out. You can try fixing this issue by following the previously explained method if your phone doesn’t allow an SD card.
Quick ways to clear your storage
As we mentioned earlier, having available storage space is indispensable to having an organized phone. Next, you will find some advice on how to keep your storage as straightforward as possible and still keep your essential media and all your apps:
Always clear the cache of your apps: the cache information states for all the data that the apps have gathered since they are in use, but it can accumulate for years and take a lot of storage. Delete it this way:
- Open the Settings app.
- Go to the Storage section.
- Now you can see how much storage you have left and all the categories taking it.
- Click on the sections you would like to check and select the app you want to clear.
- Next select Clear cache. Depending on how much there is, it can take a couple of minutes.
Use Files to get rid of all the irrelevant information: sometimes even though you deleted something, it will stay on your phone for weeks until it is finally gone, but, if you use Files, the things will immediately be deleted without leaving a trace that would take up your storage.
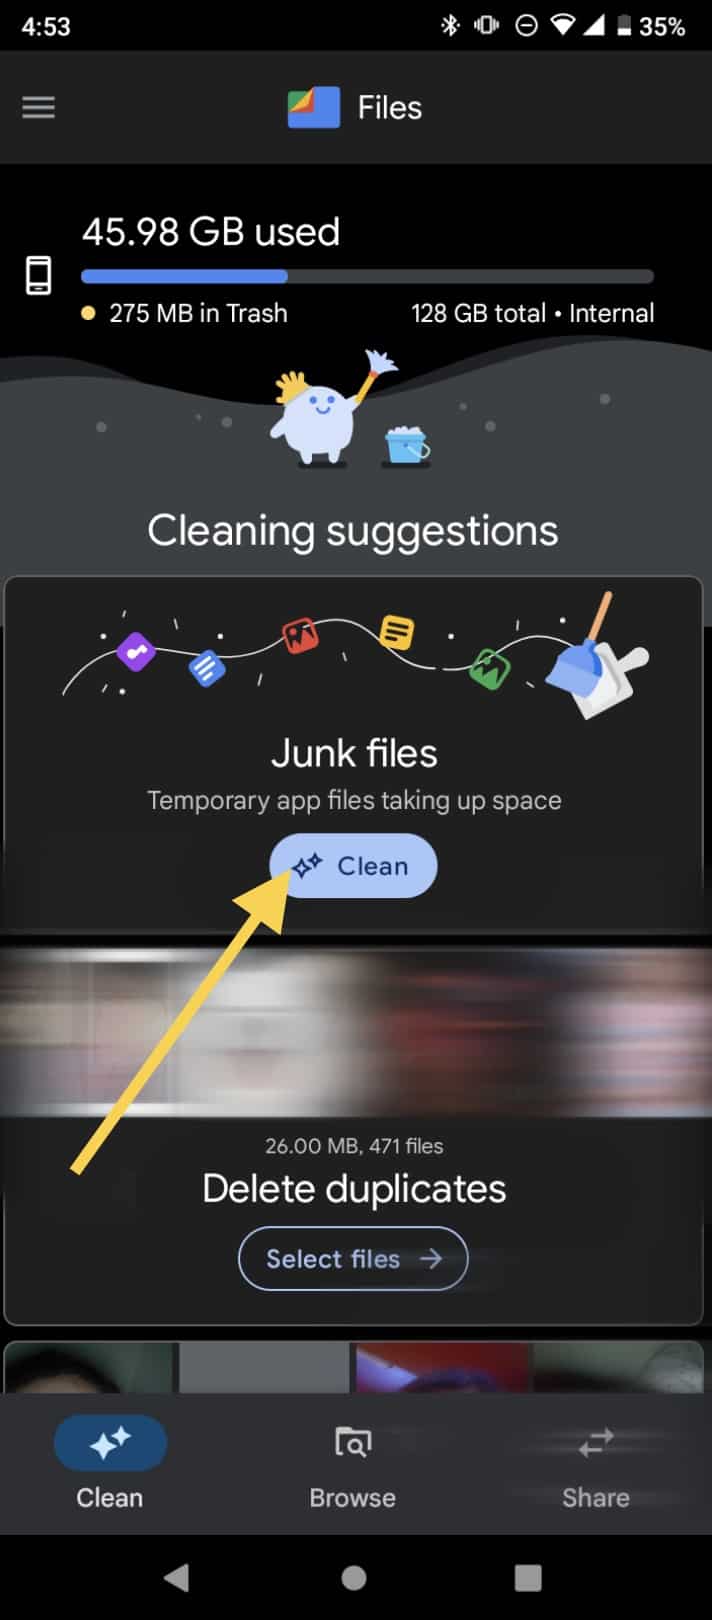
- Once you open the Files app, go to the Clean section.
- Now click on the Clean button located under the window that says Junk files; these are temporary files that aren’t necessary.
- You can also select files from duplicates, blurry photos, old screenshots, large files, unused apps, downloaded files, and more. You can check each category, and it will show you what you don’t need.
- Of course, you can keep up with maintenance by deleting pictures on the Browse section now and then.
Try Storage Manager: this feature was first introduced when Oreo was launched and has been very useful for users these past couple of years. It is an intelligent feature that constantly gets rid of junk files without asking. It manages your files. You can turn it on this way:
- Go to the Settings.
- Click on Storage.
- Tap on the Storage Manager switch to turn it on. It can also say Smart Storage depending on your phone.
- Now your files will be automatically managed by your phone.
Check your downloads: it isn’t weird to constantly download files, pictures, audios, and videos, and they often are stored on this section rather than the gallery or documents. However, they tend to take up a lot of space, and we always forget about them, so keep an eye on them. Same thing with the trash on the gallery.
Final Lines
We hope that all of the procedures help you arrange and clear your phone storage. In addition, we recommend you periodically organize all of your information and media to be able to know where everything is, along with the proper function of your device, by getting rid of all the junk files.
Fortunately, there are a lot of ways of organizing your phone. As long as you take the time, it will only make your life easier. Also, if you aren’t a fan of any of the methods we explained earlier, you can always use Google Drive to manage all your files and media.


